Thursday 31 December 2015

Dreamees | One Layer Cards

Happy New Year's Eve!

Today I wanted to share some quick and easy one layer cards that I made using some lovely floral Dreamees stamps. 


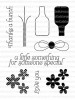
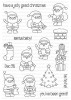
The flower stamp collection I used is called Tacked and Treasured A5 stamp set with a collection of sentiments from the Gift Sentiment stamp set (both pictured below). 


To create these cards I masked off the left edge of the card with washi tape so that the design remained on only the front of the card. To create the flowers I stamped each flower twice, the second time slightly rotated. I used a variety of the different sizes of flowers and then filled in the gaps with leaves. All of the stamping was done with Memento Tuxedo Black Ink. 


I only stamped the flower s and leaves around the edges of the card (heavier at the bottom) and then stamped the sentiment in the centre. All of the colouring was done with Spectrum Noir pens. 

I really like the look of this colouring on kraft card so wanted to give it a go. I managed to make this batch of cards quite quickly which makes them perfect for when you need an emergency card for any occasion. 

Thanks for reading! Let me know if you have ever tried colouring on Kraft card and what you have used :)

Friday 25 December 2015

Christmas Card #4: Lucy Cromwell at Christmas

Hi there, I'm back again for my final installment of my Christmas Card series. This time I've got a collection of cards that I made with a card kit from the Lucy Cromwell at Christmas line by Docrafts. I bought this kit in the sales last year so it really didn't cost me very much, I love bargain hunting!


Anyway, the purpose of the kit is that it contains everything bar adhesives that you will need to make these cards. The decoupage is pre-cut and ready to be punched out and assembled and the card blanks are each printed with a design. 


I love kits like this, they are really handy when you need a variety of cards quite quickly and I find them very easy to work with. 


Hope you enjoyed my last installment, and that you are having a very Merry Christmas!

Hayley


Thursday 24 December 2015

Christmas Card #3: Santa Baby

Hello and welcome to Day 3 of my Christmas Card series. This card is very similar in design to yesterdays card, however this one uses images from the Clearly Besotted Santa Baby Stamp Set.

The images and sentiments were all stamped using Memento Tuxedo Black Ink, coloured in with Spectrum Noir markers and fussy cut. 


The three squares were cut using the Lawn Fawn Stitched Squares dies and adhered with foam squares with each Santa adhered on top.


The backing paper was also taken from the Dovecraft Back to Basics: Christmas (Traditional) paper pack which matched brilliantly with the colours I was going for. 

Thanks again for stopping by and I hope you'll stop by again soon to see the final installment of my Christmas Card Series. 

Hayley

Wednesday 23 December 2015

Christmas Card #2: Little Elves

Hello again! Today I'm back with another Christmas Card, this time made using the Little Elves Stamp set from Clearly Besotted. I stamped the elves using Memento Tuxedo black ink onto white card and coloured them in using Spectrum Noir Markers. I didn't get the matching dies so I fussy cut them out. 


To create the squares I used the Lawn Fawn Stitched Rectangles and cut one of the small ones out of red card 3 times. The greeting was also stamped in the same black ink and I created a flagged banner out of some more red card.


I used a variety of papers for the backing but all were from the 12"x12" paper pack from Dovecraft called Back to Basics: Christmas (Traditional). 


Thanks for stopping by and I shall see you again tomorrow with more Christmas Cards!

Hayley 


Tuesday 22 December 2015

Christmas Card #1: From Our Home

Hello there, for the next few days I'm going to be sharing the Christmas Cards that I have made this year to send out to my family and friends. As this is the first year that I have gone completely handmade I decided to just choose a few designs and make quite a few of each. With this card I wanted to recreate the digital card that Stephanie from Clearly Besotted shared on her blog. 


For this first card I used the Clearly Besotted From Our Home stamp set and die and also the Tag Along It Die Collection. 

I stamped and die cut the beautiful wreath image with Memento Tuxedo Black Ink and coloured it in with my Papermate Flair pens. I stamped "Season's Greetings" onto some red card and cut it out using the flagged tag from the die set. The rest of the sentiment was stamped straight onto the kraft paper backing. 


.

Hope you enjoyed seeing the first of my Christmas cards and are looking forward to seeing the rest of them!

Thanks for stopping by :)

Monday 21 December 2015

Clearly Besotted Haul October - November 2015

So I went a little crazy and bought quite a few things off of my Clearly Besotted wish list lately. I've placed two orders over the past couple of months, one considerably larger than the other :p Here's a list of everything that I have bought:

Little Elves
Arctic Animals
Christmas Sparkle
Best Birthday
Let's Roll
Looking Up
Make A Splash
A Little Something
Love Blossoms Die Collection
Frame Mat Die

Tag Along Die Collection
Birch Background II
From Our Home
From Our Home Die 
Santa Baby 


I love Clearly Besotted stamps and Stephanie's designs are always brilliant. I've attempted to make all of my Christmas cards this year and I've used all Clearly Besotted products. (Blog post to follow)

Thanks for stopping by, 
Hayley :)


Wednesday 2 December 2015

Happy 60th Anniversary

Hello there! 

Today I've got a quick card made with the docrafts Midnight Blush collection and Typography number stamps. 

I simply created a couple of layers of contrasting colours and then stamped the numbers on the same paper as the base and cut them out. 

The "happy anniversary" sentiment was stamped from an Avery Elle set called Simply Said: Happy using my favorite black ink, Memento Tuxedo black. The 'th' after the 60 was stamped using an little wooden alphabet set from Dovecraft that you can get in The Range or Hobbycraft.

The finishing touches were to pop the big numbers up on tiny foam squares and add a couple of gems.

Hope you like this card, thanks for stopping!


Sunday 29 November 2015

Little Red Riding Hood

Today I'm bringing you a quick (ish) card that I made using some bits and pieces that I already had cut and coloured. Using ME Femme Frames I cut out two layers for my base layers and using the Pretty Pink Posh dies (mentioned below) I cut out the kraft tag. 

Behind the tag I used some white cardstock to stamp the greeting onto so that it showed through the holes in the tag. I tucked the critters into the holes too. Using some burlap ribbon I tied a bow and adhered to the top of the tag. 


Products I used:
  • Avery Elle Stamps & Dies - Red & Goldie
  • Pretty Pink Posh Die - Stitched Duo 1 & 2
  • Mama Elephant - Femme Frames Dies
  • Clearly Besotted Stamps - Many Mini Messages
  • Spectrum Noir Alcohol Colouring pens
  • White & Kraft & coloured cardstock from my stash
  • Patterned Paper
  • Memento Tuxedo Black Ink
  • White A6 Card Blank
  • Burlap Ribbon
  • Multi Medium Matte (Ranger)
Thanks again for stopping by!


Tuesday 24 November 2015

I've Started Project Life!

So, I finally took the plunge and decided to start Project Life! 

I've been gathering supplies over the past couple of weeks but I thought I'd show you what I started out with. 

  • American Crafts 12x12 D-Ring Album - Camera Print
  • Project Life Jade Core Kit (616 cards)
  • Project Life Jade collection 6x4 textured cards (60 pcs)
  • Project Life Jade collection 3x4 textured cards (60 pcs)
  • Project Life Page Protectors - Big variety pack 2 (60 pcs - 40x Design A, 20x Design D)


So that was my first Project Life "haul". I got what I considered to be the basics, page protectors, cards and an album, so that I could get started and add embellishments later.

The way I'm working it for now is i'm scrapping big events from the past 3-4 years. I'm still undecided whether to attempt weekly pages in 2016, but I can decide that a little closer to the time :P

Do any of you do project life? I'd love to see your pages and albums, leave me some links in the comments!


Sunday 22 November 2015

Wplus9 | From My Head Tomatoes

Hello there! Its been a while again since I last posted, I do apologise. I've been struggling to find time to make cards and write blogposts in between work but I've just bought myself a planner (review hopefully coming soon) which will hopefully help me manage my time and organise a bit better, so we will see how that goes!

Anyway, back to the cards. I got a great stamp set from Make the Day Special by Wplus9 in the sale a while ago because I just adored the sentiments. I didn't get it straight away, but when I did, I let out an audible giggle!


I tried to keep the layout pretty simple and consistent for each card. The dies I used to create the layering are:
  • Mama Elephant - Femme Frames
  • MFT Die-Namics - Rounded Rectangles
The layers were created using some paper and card from my stash to compliment the colour of the tomatoes. 


The sentiment and tomato outlines were stamped using Memento Tuxedo Black Ink and the solid part of the tomatoes were stamped in Avery Elle Pigment Inks in Cherry and Celery.


I layered together using double sided & foam tape as always. Most of all, I just love these punny sentiments!

Other products:
Thanks for reading and I will see you soon! 


Thursday 8 October 2015

Clearly Besotted | With Sprinkles

Good Morning everyone, 

Today I've got a collection of cards that I made using an excellent stamp set from Clearly Besotted called With Sprinkles. I love the doughnut trend and thought these sentiments were adorable, so I had to have it.


The papers I used as my backgrounds were just papers from my 6"x6" paper pad stash, I couldn't tell you where they were all from off the top of my head but if you would like to know then just ask!


To give the donuts they're shine I stamped them out using a selection of Hero Arts Shadow inks and then went over the icing part using glossy accents and left them to dry. Next time what I might try to do is add actual sprinkles to the glossy accents as it's drying. Not sure whether that would work or not :P


To create my main focus panel I cut some circles out of white card using the Lawn Fawn Stitched Circle Dies and stamped a variety of the sentiments onto them using Memento Tuxedo Black ink. I then adhered the doughnuts into them using foam pads and did the same thing to the circle panel. 

The full stamp set can be seen below:


Hope you like these cards and I will talk to you soon!


Sunday 4 October 2015

You are kind of amazing, just sayin'.

Hello there! 

I've been attempting to use some of my pre-coloured images and decided to revisit the gorgeous Wplus 9 set, Unforgettable. 


This card came together pretty quickly, I used some scraps I had in my stash from the Avery Elle paper pads The Bright Collection & The Sorbet Collection and created a background using these by layering them up.


I cut a white tag using the Pretty Pink Posh Die Stitched Duo 3 and stamped the greeting onto it using Memento Tuxedo black ink. I adhered the little watercoloured elephant onto the tag using a foam pad and then did the same to the tag and stuck it onto the card.

I'm quite enjoying trying to use up all my bits and pieces. I'm attempting to use up what I ahe already before I start using my new supplies. I figure that I'm so eager to start using my new stuff that it'll push me to use my older stash. We'll see though :P

Thanks for reading and hope you have a great day!

Tuesday 22 September 2015

Docrafts | Little Meow

Hello there! Today I've got a couple of cards I made using a kit from Docrafts called Little Meow. 

I managed to get this kit as a super bargain from TK Maxx, it only cost me £9.99 and it included:
  • Little Meow Ultimate Die Cut and Paper pack (48pcs)
  • Little Meow 6"x6" cards and envelopes (12pk)
  • Little Meow Die Cut Sentiments (2pk)
  • Little Meow Bows (12 pk)
  • Little Meow 4"x4" Clear Stamps (12pcs)
  • Little Meow 75x140mm Mini clear stamps (5pcs)
  • Glue Stick
I thought that was an amazing deal considering the Ultimate pack usually retails for £12.95!

Now, onto the cards that I made. I don't usually buy the ready made printed card bases but since they came with the kit I thought I'd give them a try.


For my first attempt I made up two of the decoupage sheets that come in the main kit. I just love these kits (I have quite a few of them) because they are so easy to make and instantly create a card, all you have to do is add a few embellishments. 


I am definitely happier with my second card that I made. I did a bit of ink blending to tie everything together, a technique I've been getting into lately and quite liking and used some dies I've been wanting to use for SO LONG now which is part of the reason I think I like this card so much.

  I have been in a bit of a slump lately with my crafting, I think it's down to the fact that I don't really get any time to myself these days. My daily routine seems to be get up, go to work, come home, cook food, eat food, watch a bit of tv, clean up, sleep, repeat, and to be honest, its a bit pants. 

More recently I've been getting back into the swing of things so lets hope my positive attitude continues!

Back to the cards now, here's a list of the products that I used:
  • Little Meow Ultimate Die Cut and Paper Pack
  • Little meow bows
  • Little B Scallop Circles Dies
  • Lawn Fawn Stitched Square Dies
  • Lawn Fawn Stitched Rectangle Dies
  • Worn Lipstick Distress Ink
  • Cream Card
  • Burlap ribbon
  • Adhesive Gems
Thanks for stopping by and I'll see you next time!


Thursday 17 September 2015

Dreamees | MDF Butterfly Home Decor

Hello there! 

Today I wanted to show you my first attempt at working with MDF. I've had some butterflies and hearts in my stash for a while and I've been watching the Dreamees Girls on TV for a while and decided I'd take the plunge and just have a go at MDF, after all, what could go wrong. I think it turned out quite well!

I took my butterfly MDF shape and stuck on a piece of cream card using a wet glue and then cut off the excess using a craft knife. I then went around the edges using a round distress tool and some Gathered Twigs Distress Ink.


I took out my Dreamees stamp sets (mentioned below) and used the sprig from Gift Sentiments to stamp around the edge of the butterfly in gathered twigs. I stamped the greeting from the same set in black ink on some white card and again, distressed the edges to tie it in. The two flowers were stamped from the set Ditsy Stitches onto cream card, cut out and embellished with 2 4mm flatback pearls. 

Before I assembled the butterfly I attached a piece of burlap ribbon from my stash using double sided tape and added 2 more pearls. The sentiment piece was added using foam tape to give some dimension. 

To finish, I poked back through the holes in the MDF shape so that I could thread some string through and hang it up.

Products I used:
  • Dreamees Gift Sentiment Stamp Set
  • Dreamees Ditsy Stitches Stamp Set
  • Flatback Pearls
  • Cream & White Card
  • Ribbon
  • Gathered Twigs Distress Ink
  • Memento Tuxedo Black Ink
  • String


Hope you liked this project, it's a little different from a card but I really enjoyed making it!

Monday 14 September 2015

My Favourite Things | Level Up & Game Controller

Hello everyone! 

Today I've got a collection of cards I made for those gamers in our lives. I just love these sets from My Favorite Things. They do some great "companion sets" which are a stamp and a die set that coordinate, but what I love is that both work separately. Of course, having a gamer boyfriend, I had to get both! These sets aren't just great for those tricky masculine cards, but would also be great for gamer girls! 

To make these cards I started off by creating my matts. I cut a black square and then a coloured square using a Lawn Fawn Large Stitched Square. I then made the sentiment panel using the Pretty Pink Posh Stitched Duo 2 outer edge die and stamped a selection of the sentiments in memento tuxedo black ink.


I cut out the controllers from black card and went over the buttons with glossy accents. I then cut out the little circles for the other buttons using some more coloured card and adhered with Multi Medium Matte from Ranger. 

To finish off I added the sentiment panel and controller with foam pads and adhered the matts together and onto the card blank using double sided tape.


The Products I used are:

  • My Favorite Things - Level Up Stamps (Pictured below)
  • My Favorite Things Die-namics - Game Controller (Pictured below)
  • Lawn Fawn - Large Stitched Squares
  • Pretty Pink Posh - Stitched Duo 2 Die
  • Glossy Accents
  • Assorted Coloured Card
  • Black card
  • Memento Tuxedo Black Ink
  • White square card blanks


 Thanks for stopping by!